Posted on

ADAPTING HALVIS AND VISSER FOR MACHINE KNITTING

In the spirit of clearing up/out and getting things in order for whatever is next, here are some notes I’ve had half-typed up for a good long while. More than five years ago and possibly less than ten, I was given a knitting machine by the neighbour of friends – she had dementia and no longer had the capacity to use the machines. She could still remember what belonged with what. In this way I got a standard gauge Brother machine, the machine knitting section of her bookshelf and a Hague Linker (a blue thing on a tripod that she knew I needed, but not what it was anymore – at the time, I had NO idea). It seemed respectful to learn what to do with all of it. Up until then I’d had the standard hand knitters’ opinion that machine knitting was somehow cheating, in some dramatically different way than using a sewing machine, drill or blender. I took a year of machine knitting classes at Morley College on Fridays with Jo Thompson. It changed the way I knit and think about knitting, enriching my hand knitting and how I approached it, as well as adding a whole new set of skills and options provided by the machine. While the stitches formed by both hand and machine have the same structure, each can lend itself better to certain things. Some things are harder to do by machine that can easily be done by hand, and others harder by hand than by machine. And of course, there’s the time factor, which makes them very different beasts indeed.

For the most part, I now knit things by hand that don’t make sense on the machine. Certainly, I try to design hand knitting patterns that are intrinsically easier or indeed only possible by hand, with all the accompanying challenges and satisfactions. Yet, occasionally a pattern pops out that can be easily adapted to be made on the machine too.

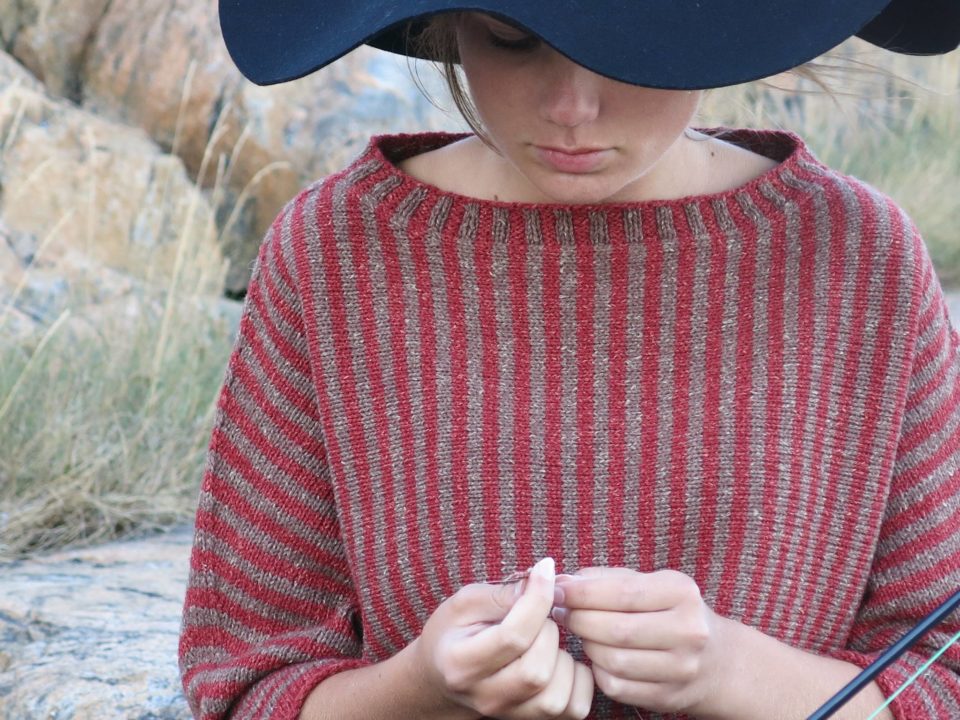
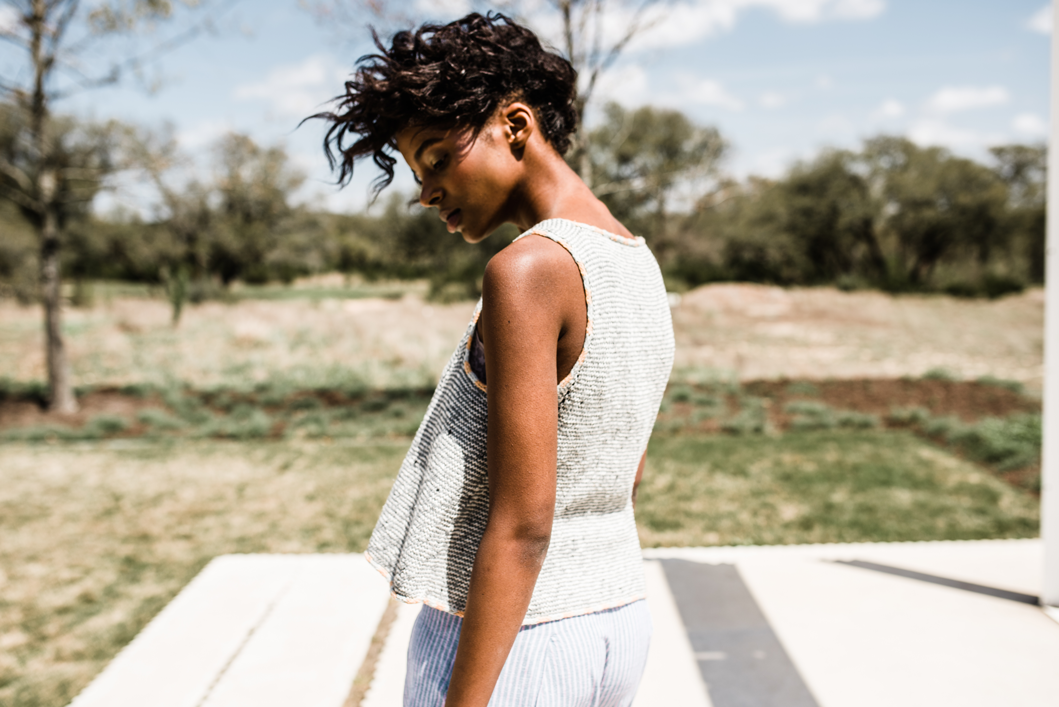
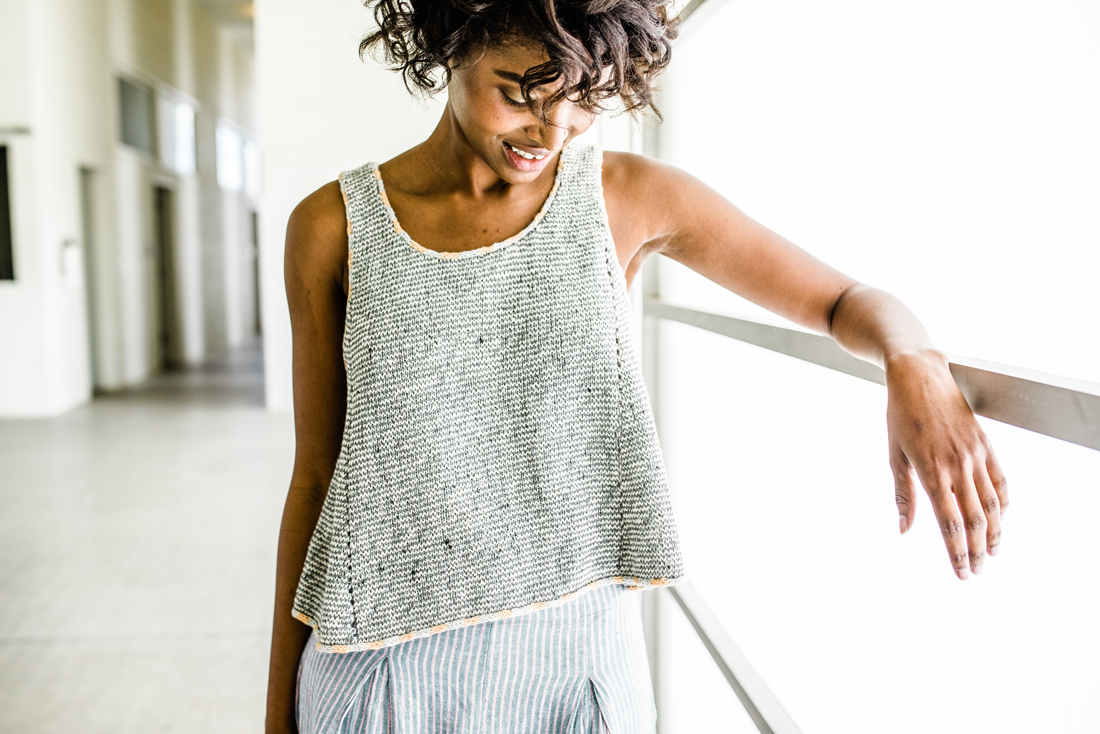
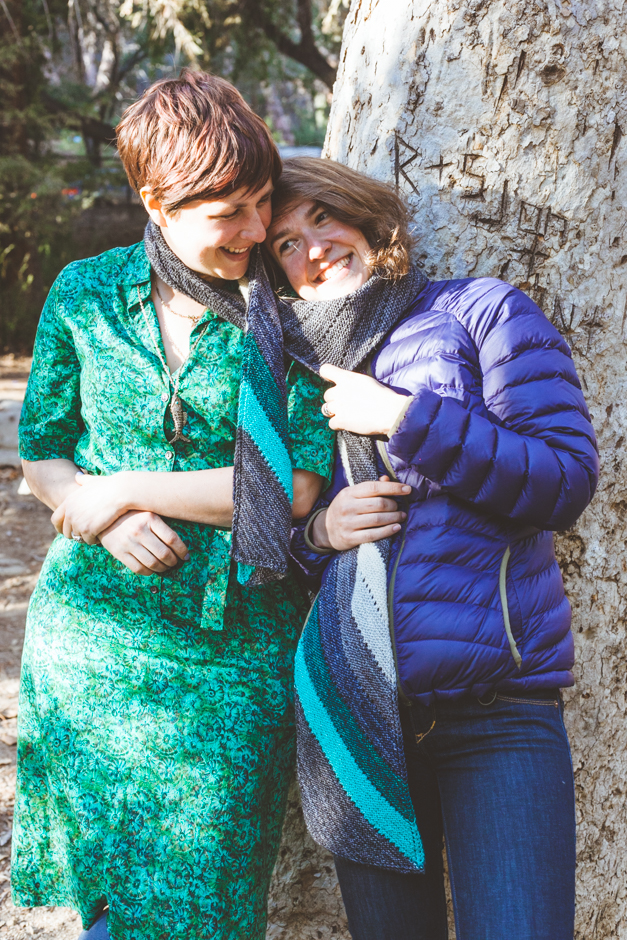
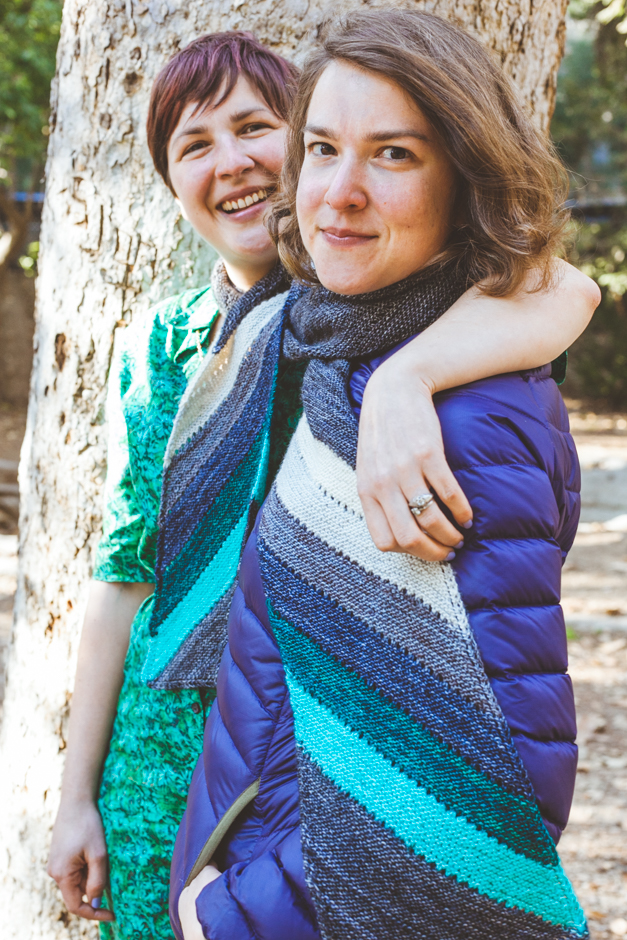
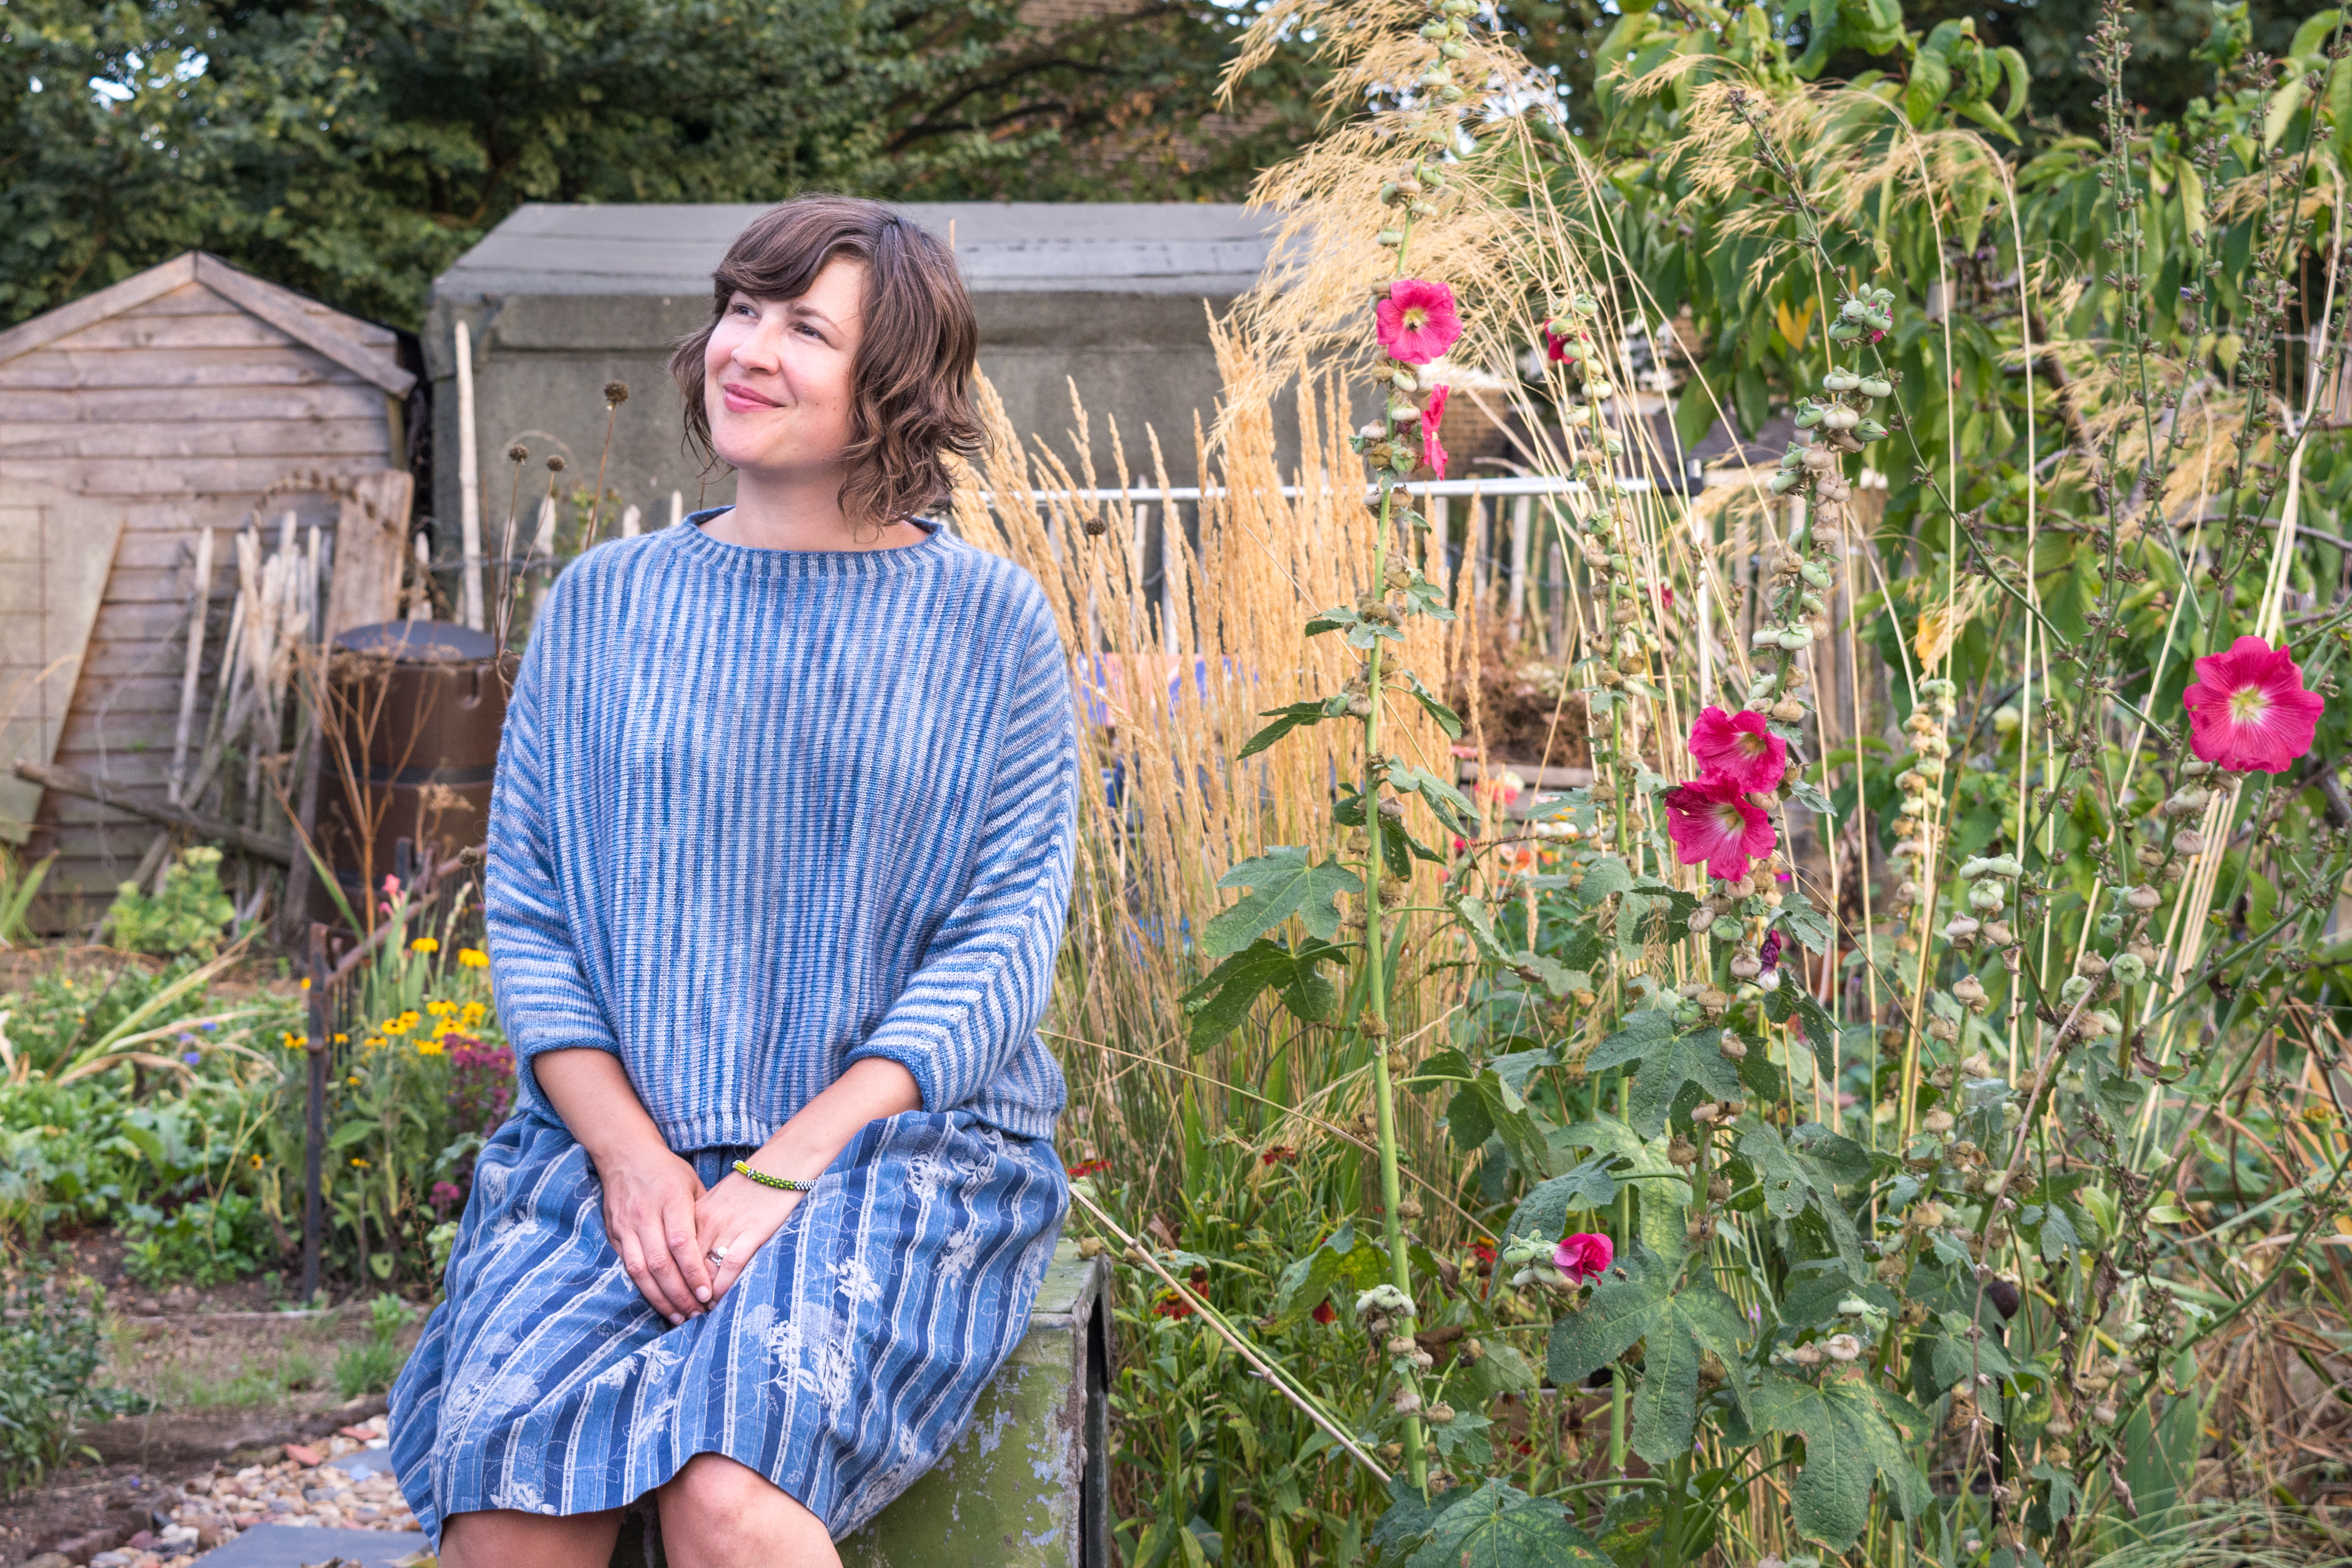
My Halvis and Visser sweaters use the same basic construction, with subtly tweaked dimensions. Halvis is written to be worked in 4ply/fingering weight and Visser in DK/light worsted. It’s an unusual construction, which I hadn’t come across before, though all likelihood it was out there. I’ve certainly seen it adopted elsewhere since. I am especially proud of it, as not only does that make for an interesting knit (even for the seasoned knitters amongst us), but it importantly also looks good on the many different bodies I have seen versions on. Garments with sideways knit bodies usually rely on batwings to allow movement around the armholes. The inset Sleeves of Halvis and Visser, with the extra hidden ‘seam’, creates more structure that doesn’t slouch or ‘pull’ at the shoulders the way it can with a batwing. There’s also less ‘wing’, making it a shape less easy to date, and the decorative decreases along the top, rather than under the sleeves are fun and follow the body well. I wear mine for a comfortable, oversized fit, but this can be adjusted to personal taste.

Having knitted both a Halvis and Visser sweater by hand, I then made one of each using a knitting machine. By hand, it’s A LOT of stocking stitch, which, I know, at times/for some can be wonderful, repetitive yet productive, mindless/full satisfaction. As someone who knits as work, it just feels like, well, a lot of slow-going, work. Work that a knitting machine could do quicker.

I have no experience of following or writing patterns for use with a knitting machine. My intention is to give pointers to help you adapt my hand knitting patterns for machine, but you’ll need to rely on your own experience and smarts. And you’ll need to have bought the Halvis and/or Visser patterns for any of this to make any sense at all. You can find them for purchase here: Halvis and Visser.

These notes are not intended to be or replace the pattern in any way, but hopefully they make some sense and will help you with your own puzzling and calculations. They are also notes for myself, if I ever make more by machine (because, while I think I will remember, I won’t). 

GENERAL POINTERS
– Just a little reminder, cause you’re on a knitting machine, not knitting flat by hand: you will always be working from the wrong side (aka. with WS facing), so adjust accordingly. 
– You will still need to work the corrugated rib Neckband and Bottom Edge by hand.

TYPE OF MACHINE AND KIT
In terms of machines and accessories, I have both Brother standard gauge and chunky machines. I do not use a ribber (haven’t learnt how yet), so the following tips are based on using a single bed (with no ribber attached), and the standard transfer (1, 2 and 3 stitch) tools and latch hook that come with the machine. I also used scrap yarn for casting on and off (explained in ‘Scrap Yarn for Grafting’ below).

GAUGE
My personal handknit gauge ratio (stitches to rows) is close enough to match the knitting machine gauge ratio, so I was fine to combine machine and hand knitting. It also doesn’t bother me that the stitches worked on the machine are just slightly smoother than those I work by hand. After blocking and wear, the difference really fades away. And most folks looking wouldn’t spot it (or mention it if they did), and the folks who do, well, they’ve probably got bigger problems being them.

In other words, you gotta swatch for both hand and machine tension, if using both, so they match (closely enough). And make note of what they are somewhere you will for sure remember where, for future reference.

GAUGE FOR HALVIS
I worked my Halvis Body on a standard gauge domestic Brother (with no ribber attached).
– I set the tension dial to 7.
– I set the tension dial to 10 to work the cast-off row for the Upper Body (on Front and Back, that becomes one side of each armhole). Just remember to put it back to 7 after!

GAUGE FOR VISSER
I worked my Visser Body on a chunky gauge domestic Brother (with no ribber attached). It was a while ago (a few years), so I don’t remember the settings. I’ll add them if I make another one.

NUMBER OF NEEDLES NEEDED (AND SIZE RELATIONSHIP)
Depending on how many needles you have in the bed of your machine, you may not be able to work the larger sizes on the machine (without shortening the length of the Body (which could in turn be replaced with longer ribbing…)). To check, compare the number of needles you have on your machine with the greatest number of stitches you will need, as specified in the pattern. This will be the number of stitches that span the top of shoulder to the bottom edge. As long as your machine has enough needles for the largest amount of stitches – the drop from top of the shoulder to bottom edge – you are good to go with the numbers in the pattern, as is.

Maximum number of Body stitches needed for Halvis: 131 (133, 137, 143, 147, 153) sts.

Maximum number of Body stitches needed for Visser: 105 (110, 115, 122, 127, 134) sts.

WHERE ON NEEDLE BED TO CAST ON
Make sure to cast on the stitches far enough over, so that as you increase for the Underarm Shaping and Upper Body, you have sufficient needles available. To be sure, you could start at the very right edge of your needle bed (and always increase on the left side). I prefer to work as close to the centre of my needle bed as I can, so I did the little extra calculations to work out where on my bed to start, so I ended my final increase on the far left of my needle bed.

If you want to lengthen the Body (and have the spare needles in your bed to do so), cast on extra stitches at the start and maintain these throughout, keeping them consistently in the Lower Body. This is clearly explained and highlighted in the Halvis pattern and not hard to work out in the Visser pattern.

Sleeves should be placed centrally on the bed.

SCRAP YARN CAST-ON FOR GRAFTING
If you wish to graft the seam along the edge of the Lower Body (rather than mattress stitch it – both options given in patterns), cast on and off with a few rows of scrap yarn (say, at least 6) in a noticeably different colour. Use a smooth yarn you can easily pull out – I know my machines came with a really slippery line of nylon cording that can easily be pulled out. Then, graft together BEFORE unravelling or otherwise removing waste yarn.

LOSE THE GARTER EDGE
Do away with the garter edge. It is there as a guideline to make picking up stitches easier and neater, but it isn’t a necessity. A garter edge is easy to do when knitting by hand, but, while possible and not complicated, slows things down when using a knitting machine, for minimal benefit.

WORK STRIPES BY REMOVING AND REPLACING CARRIAGE
To work the 3-row stripes, I removed and replaced the carriage on the other side of the needle bed (quicker, safer and less fuzz-inducing than putting stitches on hold every few rows). Yes, it is a fiddle. I found it useful to put the guide rails on.

INCREASING
When increasing avoid creating an eyelet. I used the 3-st transfer tool. I transferred 3 sts over to the left to leave a needle free and then twisted the strand in between (using the single stitch transfer tool) and placed it on the freed up needle. I made sure to always twist each increase stitch in the same direction (to replicate the M1R on RS specified in the pattern). 

DECREASING
Make sure all decreases will look the same on the RS, remembering that you are always working from the WS on a knitting machine. To decrease, so that the decreases work like a k2tog on the RS (p2tog is used on the WS) as specified in the pattern, I used the 1-st transfer tool to move the 4th st in from the edge, to the left, onto the 3rd st in from the edge and then used the 3-st transfer tool to move the edge 3 sts (including the doubled stitch) to the right, to close the gap. 

ADAPTING SIZES
Just a couple of extra suggestions to make it fit how you need/like…
For a small increase, I’d suggest adding a Stripe each of A and B to Front and Back Necklines (+4 Stripes in total), which would widen the neckline a little. You would then need to add the extra stitches to the corrugated rib neckline (that will, ideally, be obvious how to once you get there).
You could sneak 3 extra Stripes in (colour order; B, A, B) in the straight section at the centre under each armpit (+6 Stripes in total). You would then need to pay attention to the knock-on effect on the armholes – Sleeves would need to be 6 sts bigger.
Add 2 Stripes (one each of A and B) on each Shoulder (+8 Stripes in total). If you wanted to keep the length true to the pattern, you’d need to shorten the Lower Body length to account for extra decreases that will be made, by transferring then from Lower to Upper Body, or add those extra stitches to the Upper Body.

ARMHOLES
Do not be tempted to leave stitches live on the Upper Body when creating the armholes for the Sleeves (whether by casting on with a provisional cast-on or not casting off). The specified ‘seam’ (picked-up-and-knitted into the cast on/off) is necessary for the structural soundness of the garment. Do make sure to cast on/off the stitches loosely around the armholes. Loosely, because when you pick-up-and-knit into them, these stitches need some space. For casting off, you can do this by increasing gauge on the row you will cast off (it’s standard to turn the tension dial up by 3). Just remember to return the dial to the regular setting afterwards!

WORKING THE SLEEVES
I used the machine to work the Bodies only, because I wanted to keep the Sleeves knitted in the round (by hand). In this way, the construction stays pretty much true to how the patterns are written. It is however possible to knit the Sleeves on the machine too. I haven’t tried it myself yet, but I’ve thought it through. I would suggest trying it as follows.
You can cast on the Sleeves as separate pieces to sew up and on later OR you can rehang the Body on the machine and work directly from it. If you wish to do this, do graft or sew up the side of the Lower Body BEFORE hanging on the machine to work the Sleeves, but do not sew up the Shoulder seams until AFTER. Re-hang the Body (from the armholes, with the underarm in the centre) on the machine to work the Sleeves directly from the Body.

Split the instructions for working in the round in the centre of the decreases. The decreases should be worked a couple of stitches in from the edges, in the manner used for the decreases on the Shoulders. Make sure to add an extra stitch at each edge, to give yourself a seam allowance (selvedge) along both edges of the Sleeve (these are not present/necessary when knitting in the round).

You want to keep the decreases where they are, running along the top of the Sleeve, because they are a decorative feature of the sweater. Also, I don’t suggest working the Sleeves with the seam under the arm, because, as the decreases run along the top of the Sleeve, NOT underneath, this would mean a ton of transferring of stitches, as the decreases would fall in the centre of the of the stitches being worked. 

Once the Sleeves are complete, you will then seam all the way from the Shoulder (neckline edge), down the Sleeve to the cuff. Finally work the Neckband by hand.

Links to patterns:
Halvis
Visser

Posted on

i-cord for the Tarmac Tank

It was a pleasure to design the Tarmac Tank for PomPom Quarterly Summer Stripes Issue number 25, 2018. Most of my knits are woolly and warm, but I love adding the occasional pattern for my knitting friends who live in constantly warmer climates, both with knitting and wearing in mind. And of course, there has been a super heatwave in London (and beyond) this summer, so it’s felt like we might never need a sweater again.

The Tarmac Tank is knitted in Yoth Best Friend, a slightly slubby 4ply/light fingering weight yarn that is a combo of 75% cotton and 25% wool, perfect for all but the stickiest summer days. The addition of wool helps the yarn keep some memory (in comparison to only cotton) and the teeny bit of stretch it adds makes for a more pleasant knitting experience. The little slubs soften the monochromatic single-row/round stripes, to give them a shimmering effect, like heat rising from hot tarmac. Vertical rows of eyelet increases from 4 points introduce A-line shaping for a floaty shape.

I have been loving watching other knitters’ Tarmac Tanks appearing on Ravelry and Instagram in many different colour combinations. The endless possibilities of knitting is one of the things that keeps me fascinated (to the point of obsession) by it. I’d love to try a million different colour combos, but obviously there’s the time issue, so it’s great to be able to see what other knitters chose, and be able to knit vicariously. Some knitters are even on their second Tarmac Tank already!

There are sunshine colours (@cribbetcribbet), and earthier ones (@ribbels_ribbels). Some knitters have done away with the stripes in order to use a marled yarn (@sarahjaymes), or use a variegated yarn (@marion_strickt), while others have colour-blocked the placement of stripes. For this, two very different approaches can be seen from @mestre82, who combines the stripes with a plain section, and @annatricote, who has cast-on her second one and is using stripes of stripes, perhaps inspired by all the colour-combo testing that @meghanaf has been up to with all the shades of Yoth Best Friend. All these approaches not only add great customising options, they are really smart choices for using the yarn you have stashed. On this note, there’s a lovely one knitted by @knitcola, using an ombré of oddments. Madelene of @stickkontakt has knitted hers in fine linen, which makes it gloriously see-through.

As for the i-cord edgings, some have honoured the striped i-cord and made it pop even more (@emmaknitsthings and @fillyourknits), while some have gone with a plain single colour (@bmid.ltd, @frau.schaefer, @britt.schmeising, @sunnelite, and @josephineandtheseeds). It might have been for a different project, but I don’t think I was dreaming that I’ve seen one that uses a variegated yarn for the i-cord…

All those options have made me realise I should stop being awkward/shy/slow and just share the video I recorded while I was finishing the Tarmac Tank I knitted for myself (actually, it’s a team-knit between my mother and I, but I go into that in the video). The video is just me sitting on my couch, in my living room, talking it through, before I move to my kitchen table to give a close-up of how I work the stitches. It’s not slick, it’s not pro, but there’s plenty of info being shared. And I especially did it because there’s not much out there on striped i-cord.

I’ve split it into two parts, because, well, I’m not concise and it got LONG.

Tarmac Tank: Part One (Construction) is comparatively short, and gives an overview of the construction of the whole tank. We all learn in different ways, and some knitters might appreciate me waving the tank around and talking through what happens where, as an addition to the clear written instructions you’ll find in PomPom Quarterly.

The single row/round stripes can be worked easily without leaving a ton of ends to weave in, if you simply slide your knitting down to the other end of your circular needles or DPNs (double pointed needles).

The eyelets travel down the front and back of the Tarmac Tank in a straight line, because the eyelet increases are worked to different sides of the markers, consistently, so all the extra stitches are added to the zones under the arms. To remind yourself which happens where, it’s useful to use two different types of markers: one that you increase before slipping the marker (say, a red one or a pony) and the other that you increase after slipping the marker (say, a blue one or a kitten). I used little swing tags as markers, so I could write on them to say what happened when.

Tarmac Tank: Part Two (How to Pick Up and Knit + Striped i-cord) is a blow-by-blow guide through how to pick up and knit and then work the striped i-cord cast-off. It’s a useful tutorial for knitters who like a lengthy explanation. Though fairly intuitive to work if you are familiar with knitting i-cord (either as a cast-on, cast-off or simply unattached), striped i-cord isn’t all that common, so I’ve shared how I do it. I’ve come up with ways to mostly conceal the float between the alternating colours when working 4-row stripes. I work the i-cord over 4 stitches, whereas the pattern as published in PomPom Quarterly uses just 3 stitches. Both work, but I prefer the slightly bulkier edge that 4 stitches give.

I use my shortest length DPNs when I knit an i-cord cast-off, and I show how I do that. Using the shorties (also great for knitting fingers on gloves) avoids needing to transfer stitches every row/round, which you need to if you are simply using the other end of your circular needle. This makes for slightly more of a juggle between needles in your hands, but once it’s familiar, it means far less transferring of stitches, and feels like a speedier solution.

I also cover how I pick up and knit, to make a neater edge, by picking up and knitting in every stitch and row, and the adjusting to the required number in the following row/round.

The i-cord edging needs to be worked over a number of stitches that divides by 8. This is useful to know if you want to make the top longer/shorter – just keep/stop increasing and working as set until you have reached a length you like and then make sure the number of stitches can be divided by 8. If your total remaining stitches divide by 8, you are good to go for striped i-cord (if you are using plain i-cord, you can stop whenever you want). This is also useful to remember if you want to adjust the number of stitches around the neckline or armholes.

Somewhere along the line this got confused in the published pattern in Pom Pom, so you’ll find errata for sizes 1, 2 and 3 on the Pom Pom Quarterly Errata Page for Issue 25 for the final round before you work the i-cord. The solution given there, to increase evenly 4 times around a final round, was chosen because it works well without changing the measurements of the top and adding more instructions. Personally I would stop knitting after 20 (21, 22,23, 24, 25) times for 280 (296, 312, 328, 344, 360) sts OR continue knitting for 22 (23, 24, 23, 24, 25) times for 288 (304, 320, 328, 344, 360) sts RATHER THAN the printed 21 (22, 23, 23, 24, 25) times for 284 (300, 316, 328, 344, 360) sts. This hasn’t been suggested in the PomPom errata, because it has a knock-on effect to the measurements of the top, and those are more lengthy to change. It’s super intuitive to do when you are knitting, so it’s really nothing to worry about, it’s just frustrating if you don’t catch it, and your striped i-cord doesn’t slot in exactly.

I love this knit and I have been wearing my Tarmac Tank a lot this summer. It’s a lot of simple stocking stitch, but with enough little clever details to satisfy and tickle the brains of the cerebral knitters amongst us. And seriously, striped i-cord – I could put it on everything!

And, before anyone asks, no, the pattern isn’t available as a single pattern outside of PomPom Quarterly number 25 until next summer (edit Nov 2019: it is available now though: HERE). The top I am wearing in the video is made by Marilla Walker from her Maya Collection of sewing patterns. The marbled leggings I got in 2012 from Diana Reynolds in Sydney. She used to make them for sale in her Etsy shop, Gallery Diana. The photographs of the gorgeous model, Kandia (@kandianzinga) were taken by photographer Laura Morsman (@lauramorsmanphotography) for PomPom Quarterly and I have used them with their kind permission.

Posted on

APPLES for UNICORNS

This weekend is the LA County Yarn Crawl and this pattern is the fruits of collaboration with Gather, a magical little yarn store in the very heart of Down Town Los Angeles in the sunny land of California. You can find it nestled in an upstairs corner of The Last Bookstore, which has a tunnel built out of books and a large fantasy section. Basically it’s just the sort of place you’d expect to find a unicorn on vacation, except the unicorn in this scenario refers only to the tails of the Tosh variety.

The long (long enough to wrap around my sister and I), bias knit, garter stitch, diagonally striped scarf is a riff on my Diagonapples pattern some knitters might be familiar with. Apples for Unicorns has a slightly more forgiving number of stitches per row: 25% less and a WHOLE lot less ends to sew in as it is specially designed to utilise one full skein of Tosh Merino Light and your choice of 6 (or more!) Unicorn Tails; hence the name, Apples for Unicorns.

Basically, it’s the very pinnacle of comfort knitting. Lots of garter stitch and enough little points of interest to keep you engaged. Once you have increased to the main section of the pattern, you knit along on a comfortable bias, with eyelets every now and then to keep you incentivised to do ‘just a little bit more’. The placement of these picot rows add an element of functional beauty by disguising the change of colour between stripes to make the scarf completely reversible.The majority of this project doesn’t require close counting, which makes it a good project to do while having epic chats (such as at the cosy knit night at Gather). Though simple, it is quite striking and when you are in your stride it can prove addictive. The theory of the pattern is well explained and extensive notes will give you all the tips I’ve gathered while knitting many a bias scarf.

And now for a little more magic, you see, there are lovely overlapping people in this story. The first owner of Gather was Evi T’Bolt. It was under her invitation that I first taught there. She’s a honey-coloured force of nature. You’ll see her name appearing as the photographer of the images you see here and in the patterns. The ownership of Gather has now been passed on to Tifanee Taylor. The funny thing is, beyond the yarnie connection, Tifanee and I also have a second photographer connection in the form of E.J Rose, whose name you may recognise as the originator of the photo essay The Adventures of Pengwee and The Boy in my Penguin: a Knit Collection book or as @bigdaddylonewolf on instagram. Such as the one pictured below.

Erica and Tifanee have been friends for many years – before Tifanee moved to LA and they were both on the other side of the USA. That connection is just another thing that makes the creative circle around Gather magical, as if the ‘gather’ refers to bringing good folks together, as well as beautiful yarn. I look forward to visiting every time I am in LA, which is fairly regularly (given the long distance), due to the fact my sister (who is in the photos) and my in-laws live there.

This weekend is the LA County Yarn Crawl (6 to 9 April, 2017) which seemed like the perfect time to make sure this pattern was out in the world. Also, I know Tifanee is flush with Unicorn Tails and that’s a good thing, because that Madeline Tosh can be hard to track down because she is so popular! I wish I could drop in on Gather to say hello to Tifanee and Danielle (who knitted the sample you see here), stroke the colours of yarn and talk knitting. And I have a feeling there will be snacks.

You can purchase the pattern here on Ravlery.

Posted on 3 Comments

KETTUNØSIN

It has been thrilling to watch the crafting world turn our hands to making pussy hats in a collective show of creativity and dissent initiated by the Pussy Hat Project in a beautiful, well worded and inspiring call to craft. The founding Pussy Hat Project knitting pattern was designed by Kat Coyle of The Little Knittery in Atwater Village, Los Angeles, USA. It’s an ingeniously simple design, knitted flat in worsted weight yarn with a long rib section and stocking stitch body.

https://www.instagram.com/p/BNIfu3Vj9DB/?taken-by=p_ssyhatproject

Throughout the project, which was only started in November 2016 with the aim of making over a million hats to be worn at the Women’s March in Washington DC, many knitters, crocheters and sewers have speedily added their alternate hat designs, recipes, hacks, riffs, adaptations and suggestions to the mix along with a growing pile of finished hats. Apparently we’ve caused a national shortage of pink yarn in the USA. This is particularly appropriate if we think that much of that yarn was bought from independent local yarn shops, often women-owned and specifically supporting women in their communities. We’ve also made use of what we have in our stashes and those of friends. It has encouraged many to learn or return to knitting. Whoop whoop!

When I first heard about the project, I immediately stash dived what I thought was all my thick(ish) pink yarn. You can see it here in a picture I took of my pink yarn and groceries last year. It’s nice for me to look back at that picture and realise how much of that yarn I’ve knitted in the interim.

The woolly pink yarn that remained I offered it up to knitters for free via Instagram to make pussy hats with. It has been lovely to see all that yarn being used; transformed into hats across the UK and sent off, to be worn by marchers on the Women’s March in Washington DC on January 21st, 2017. Here are a few of the projects it became:


https://www.instagram.com/p/BO7VvQGhhAP/?taken-by=stitchbirdie


I thought I’d sent off all my pink yarn, but I found a little more!

Having missed the safe postal deadline to get my hat to the USA on time (for a justifiable rate), I decided to make myself one to wear to the sister march in London. There are solidarity marches happening all over the USA and in cities across the globe. You can find details on the main march in Washington and the sister marches here: https://www.womensmarch.com/. There is currently a glitch in that website for the international marches, but they are happening (places like Facebook might help fill in some details whether there is one, big or small, local to you). I’ll be at the one in London starting at noon outside the US Embassy on Grosvenor Square and ending with a rally on Trafalgar Square. I do hope the weather will be more conducive than it is today!

Some intense hours of knitting later and we have Pussy Hats.


In an uncharacteristically speedy move on my part, I’ve put together a really bare-bones free pattern for them. It hasn’t gone through the rigorous rounds of testing, editing, photography and graphic design that I usually put my patterns through, but you can find it on Ravelry as Kettunøsin.

Our pussy hats are knitted in the round from the brim to the ears in heavy DK/worsted weight yarn. I give a couple of options for the rib at the beginning of the hat (and accompanying cast on suggestions), because options are good. I’ve stuck with Kat’s super simple shape of a straight-across finish at the top of the hat. While her pattern is folded, then seamed at the edges, this top is made by using a 3-needle cast off. The simple shape seems to communicate the urgency of the situation and the short deadline. And the ears are decent. If you fancy getting more shapely in the ear department, there are a lot of fantastic cat ear hat patterns to be found (and invented) with all sorts of clever approaches to shaping the ears.

Since my remaining yarn was 3 shades pink Navia Trio from the Faroe Islands, I remembered there’s a cathead motif in Føroysk Bindingarmynstur, THE book of traditional Faroese knitting motifs collected by Hans M Debes and published (for many decades) by Føroyst Heimavirki in Torshavn. The chart you’ll find in my pattern is adapted from the ‘Kettunøsin’ pattern in that book. The name of the hat is the name of the pattern, which is Faroese for ‘the cat nose’.

I love the sharing nature of this project from conception through to realisation and the strong, colourful mass the marchers will create wearing them. I hope enough hats will arrive in DC on time to have the desired visual impact. I’m sorry mine won’t be there to join them, but I’ll put it to good use in London to help friends locate me. One of them has never been to a demonstration before. I’m old hat in comparison – I can remember being taken to the marches in support of the minors strike in the mid 1980s in my pushchair as a wee one.

The Pussy Hat Project is all about caring, warmth, support and friendship (with a good dose of humour and politics thrown in), while at the same time channelling a call to action which is the result of fear and anger. The hats represent not only the people who are present, but the engagement of those unable to be in DC. They’ve given people a way to feel productive while thinking through their despair. Even after the march, the hats will stay symbolic for years to come. It’s been a while since there’s been such a unified cause to knit for.